Mixing Masterclass with Chris Lord-Alge

At the end of October, Chris Lord-Alge did a live webinar for Waves where he shared some of his own mixing tips and although i’ve implemented the majority of my research in my recording session posts, I wanted to make an individual post about this piece of research as it touches on quite a few aspects that relate to my project and my learning outcomes. Specifically, learning outcome 2 and 3.

The first thing that Chris made a big point about was having an organised session for mixing. Here are some of the key points he made around this topic:

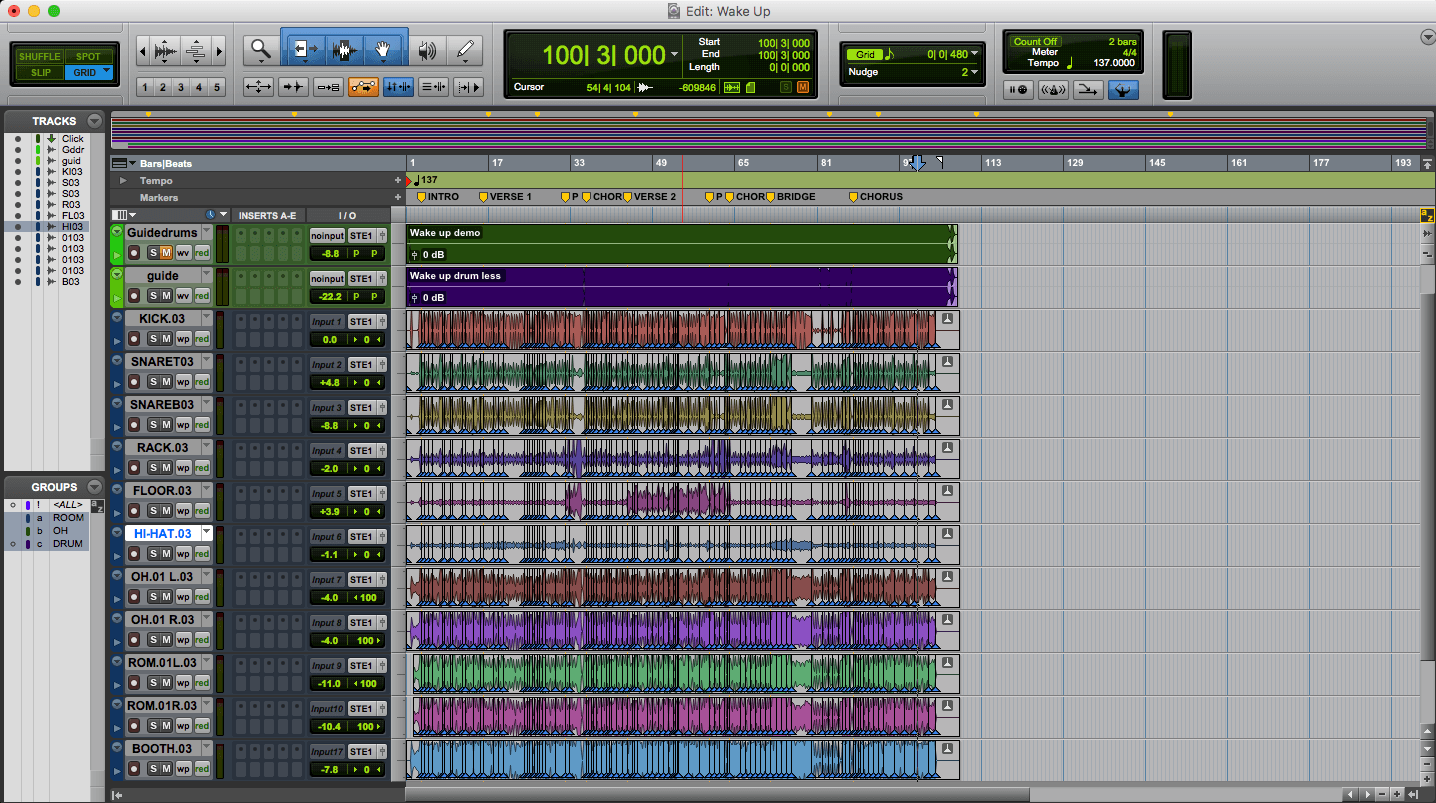
  • Try and make your session as condensed as possible without making compromises. This way the session will be lot more manageable, it’ll be easier to navigate and it’ll be easier for you to make the necessary changes.
  • Colour code the tracks to what works best for you.
  • Use queues/markers to you can easily identify different sections of the song.
  • Give tracks short names so they are easier to understand.
  • Ensure that all of your tracks have the correct gain structure so they work correctly with your plugins.
  • Make comps of tracks where possible to reduce the amount of tracks in your session and make it more manageable.
  • Organising is the most important part of mixing. If you can’t manage your session efficiently then you’ll struggle to get a good sounding mix.

Chris also gave some tips on how to get vocals to sit in the mix:

  • Make a lead vocal comp onto one track (two if it over laps), ensure it is the same level through out and then consolidate it. This will make the lead vocals easier to mix.
  • In terms of processing, he suggests cutting some of the low end to remove rumble, increasing the top end to add shine and then compressing with the CLA-76 to give it more character. He then runs it through the CLA-vocal plugin adding more top end, reverb and delay which also makes the track stereo.
  • Using EQ before compression reduces the chances of sibilance and decreases the need to use a de-esser.

From implementing these techniques into my work, I am already finding it easier to navigate through my sessions and make adjustments where necessary. I will continue doing so all the way up until the mix stage where I will also use them to prepare all of the sessions for a mix. I will also use comp and consolidate my vocal tracks to also make them easier to manage when I reach the vocal recording stage.

Drum editing

Since my last recording session with Dave, I wanted to make sure that all of the drum takes I recorded were edited in preparation for bass tracking.

Before beginning work on some of the slight timing issues in some of the drum takes, I wanted to make sure Dave was happy with the drum takes I had comped together. This is mainly because I had chosen the best bits from each take and merged them into one solid drum track. Keeping this level of communication between myself and Dave is important as it means that we are both on the same page and we know what part of the project needs to be completed next.

Once I had been given the all clear, I began going through all of the tracks making sure that everything was in phase using the pair of overheads as the main focus point. I then began to tighten the drums up by using elastic audio, setting the close mics to the rhythmic algorithm and the rest to the polyphonic algorithm. And although the majority of the drum takes were already tight and in time, going through and ensuring that all of the key hits were quantised exactly to the grid really made them flow a lot better. It also means that it would be easier to incorporate any electronic elements.

Choosing to do all of the drum editing at this stage means that everything I record from here onwards will match the correct timing of the song and save me from editing everything else when we’ve finished the recording process. It will also allow the bass to lock in with the drums more efficiently and give me less things to worry about when I come to the mix stage.

Screen Shot 2017-11-02 at 21.56.58

Here is short example of how the drums sound for the track ‘Wake Up’ after editing.


Drum tracking

For todays session, our main focus was to track all of the drums for this project. Ensuring that i also covered my first learning outcome, I wanted to make sure that I incorporated the use of some outboard compression and desk EQ when recording into Pro Tools.

Prior to the session, I spoke to Dave about the kind of style he wanted for this project as well as some of his influences. I also asked him to send me some demos so i had a rough understanding of how the songs already sounded and how we could evolve them in the recording sessions. These demos also provided essential reference points for the session drummer and really aided the efficiency of the drum tracking session.

When mic-ing up the drum kit, I really wanted to make sure that I added a room mic down the bottom of the corridor outside of the live room. Due to its reflective nature compared to the live room, this added a nice ambience to the sound of the drums and when compressed, provided a lot of excitement to the overall mix.

Once I had mic-ed up the drums accordingly, I began to incorporate the use hardware compression and EQ to mould the sound of them. One thing to keep in mind here is that the majority the of choices I made here were subtle for two reasons; there was a lot of low end spill bleeding into the control room from the live room which made it difficult to the perceive some of the frequencies I was hearing. Keeping them subtle would also give me more room to make further dynamic and EQ changes in the mix stage when i’m in an environment where I am able to hear different frequencies more accurately.

FullSizeRender

With the kick drum, I began by sweeping the frequency range to remove some the ‘mud’ and ‘boxy’ sounds within the drum. This is a technique also applied by Joe Chiccarelli but instead he uses an API graphic EQ as oppose to the EQ on the desk. I then used a similar technique for both snare drum mics however this time it was to eliminate some of the ringing and overtones coming from the drum. This is a technique I found on drumlessons.com and have found it very effective in improving the tonal qualities of the snare drum. For the toms, I used reductive EQ on the lower mids but also boosted some of the high end to give the drum more ‘point’ and attack. This technique is also utilised by Victor Guidera at drumlessons.com. Finally, when it came to the using desk EQ for the overheads, I applied a HPF to both of the mics at the input gain stage and then applied a slight boost to the high shelf at around 12khz to give the overheads a little more air.

IMG_6429 2

When it came to using hardware compression, I decided to use the Sony srp-l210 on the kick drum and snare drum and use the Drawmer DL241 for the far room mic. From my research, I have found a lot of ways that producers utilise hardware compression into their production and I chose the best ones to suit my scenario and the project. Jacquire King, producer of James bay’s debut album, spoke to sound on sound magazine about his use of compression on the kick and snare and how he used it to help the drums sit in the mix better. He uses a low ratio with about 3db of compression to prevent sucking the tone out of the drum allowing them to be more stable whilst adding focus. With this in mind, I also used this method to control the dynamic range of the snare and the kick drum.

Kick drum compression:

FullSizeRender

Snare drum compression:

FullSizeRender 4.jpg crop

For the far room mic, I kept the ratio more or less the same however I decided to be a little more aggressive with the threshold. This resulted in the room mic slamming a little more and when mixed in with the rest of the drums, not only did it add ambience, it also added a lot more excitement.

FullSizeRender 2 copy 2

FullSizeRender                                                       FullSizeRender 7

Recording a band with Joe Chiccarelli https://youtu.be/rjFPQFjIEdo

How to EQ a snare drum – Drum Lessons https://youtu.be/a2jgOOOp6UI

How to EQ toms – Drum Lessons https://youtu.be/L3r87s002nM

Jacquire King: Producing James Bay https://youtu.be/mz7ycZzAIoU


Aims, Objectives and Learning Outcomes

For my project I will be working with David Farnan (aka DB Jones) to produce a 4-track solo EP which will involve a full band sound. Stylistically it will have elements of indie, indie rock and pop genres, require me to source an appropriate session drummer and to produce it in such a way that it stands up to and stays relevant with my reference playlist.


Aim:

To work with a client to produce, engineer, mix and master 4 tracks of an EP which they can then readily release onto multiple music platforms.

Objectives:

1. To source a client and make contact with them to discuss what direction they want to take with the EP.
2. Work on pre-production with the client so we both have a clearer understanding of what we want to achieve in the recording sessions to ensure an effective workflow throughout the project.
3. Source the appropriate session drummer and work with them and the client to book all of the required recording sessions.
4. Record all of the required parts for the EP using the different outboard techniques and approaches that i have researched whilst making sure the client is happy with with what has been captured.
5. Edit and prepare all of the recorded tracks and then begin the mixing process whilst specifically focusing on the use of outboard processing and different vocal techniques.
6. Ensure the client is happy with the mixes and then, using the research i’ve gathered, master the EP so it can be distributed to the required platforms.


Learning Outcomes

1. To improve my knowledge and understanding of outboard hardware, specifically eq and compression, by researching the workings of the hardware itself, establishing how other producers use hardware and utilising it in my own work for recording and mixing.

2. To improve the way in which I tackle the workflow of the project by ensuring constant contact and communication with the client, improving time keeping and by looking at how other producers create an effective workflow.

3. To improve the sonic aspects of my vocal production by using different recording and mixing techniques that are inside and outside of the box, and then applying the appropriate ones to my work.

4. Have a clearer understanding of the mastering process by looking at the technical aspects of mastering and what it consists of, having an insight into how other producers master their work and benchmarking this project with my previous work to ultimately master this project to a higher standard than before.